



This guide integrates U disk formatting and EFI BIOS flashing procedures. It is beginner-friendly. Follow the steps strictly to complete the BIOS update successfully.
Preparations
- Prepare a U disk (8G/16G is recommended for optimal compatibility);
- Back up all data on the U disk in advance; formatting will erase all files;
- Download the BIOS compressed file and save it to your computer desktop;
- Ensure stable power supply during the entire flashing process. For desktop computers, avoid power outages; for laptops, keep the power adapter connected.
Step 1: Format U Disk to FAT32 (Full Operation)
Windows Built-in Format Tool (For U Disks ≤32GB)
- Insert the U disk into the computer USB port and open This PC;
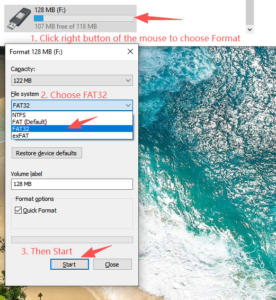
- Right-click the U disk drive letter and select Format;
- Set the formatting parameters as follows:
– File system: SelectFAT32
– Allocation unit size: Default size
– It is recommended to uncheck Quick Format for more stable BIOS flashing
- Click Start, confirm the pop-up warning, and wait for the formatting process to complete.
Step 2: Create BIOS Update U Disk
- Extract the downloaded BIOS compressed file to get the completeEFIfolder;
- Copy and paste the entire extracted EFI folderdirectly to the root directoryof the U disk (do not nest it in other folders or rename it);
- Confirm the EFI folder is directly displayed in the U disk root directory with correct file placement, then safely eject the U disk.
Step 3: Flash and Update Motherboard EFI BIOS
- Insert the prepared BIOS update U disk into the rear native USB port of the motherboard (USB2.0 port is preferred for better compatibility);
- Power on the computer and continuously press the F11key to call up the motherboard boot menu;
- Select the corresponding U disk boot option in the list and press Enter to enter the flashing program;
- Wait for the program to run and flash the BIOS automatically. Do not cut off power, unplug the U disk or operate the computer during the process;
- The prompt “FPT Operation Successful”indicates the BIOS flashing is completed;
- Restart the computer manually, enter the BIOS interface after booting, and check the BIOS version to confirm the update is successful.
Important Notes
- Do not use front chassis USB ports or low-quality U disks, which may cause recognition failure, flashing interruption or BIOS damage;
- The EFI folder must be placed in the U disk root directory. Do not modify or delete the folder name and internal files;
- Power interruption during flashing will cause BIOS damage and boot failure. Always ensure stable power supply;
- Do not restart or force shut down the computer before the success prompt appears to avoid process interruption.